Tuesday, May 29, 2012

Gradient Nails

Jordana - Cabaret, ELF's - Berry Pink & NYC's - Lincoln Square
I'm a little mad that I can only put up one picture of my first time doing the gradient manicure.  I just couldn't get a good photo at all.  I think it was okay for my first time but I will definitely try again.  The gradient look is really easy to achieve, it's the prep that is time consuming.  After doing a couple of nails I realized that I really have to tape up the others because cuticle and finger cleanup was a nightmare.  I used 3 colors here and after researching a few other blogs I decided to go with Waky Laki's gradient method which is to paint directly on the sponge.  This I found to be easiest at the time because by moving the sponge up and down I can control the color distribution pretty well BUT I will definitely be trying another method.  It seems that after going over the same spot a couple of times to get the tip a deeper color, the sponge will dry up a bit and either begin to leave small pieces on the nail or take of small chunks of the already applied polish.  Next time I've decided to follow the tutorial that the Nailasaurus posted.  It looks like her method won't allow for the sponge to dry. Thanks for visiting!!

UPDATE:  I will be working on taking the photos of the new member giveaway prize this week.  It's a good one!!

Friday, May 25, 2012

Member Giveaway

Hello to anyone who may be reading this :)  I have only a few members on my blog and wanted to try and create a nice community of nail lovers.  I was thinking about having a giveaway.  I have a bottle of Seche Vite Quick Dry Top Coat, 2 OPI Summer collection polishes, and a glass nail file that I wanted to give away as a gift to one of the members on my blog.  Only problem is I only have 3.  So if you  happen to be reading and would like to try and win, just join my blog.  I will be posting the pics of the giveaway once I take the photos this weekend.  I wanted to post this first to maybe get some feedback on my giveaway idea.  Let me know what you think.  I'd like to start a bi-monthly giveaway but we'll see how this works out.  And by the way, should there be an international winner, I have no problem shipping internationally. Thanks for visiting!!!

Rite Aid Nail Extravaganza

Inspired by Nailside
I'm so excited to have submitted my nail art to the Rite Aid Nail Extravaganza contest.  Today is the last day to submit.  I believe they will choose the top 10, then the public will vote for a winner beginning June 12th.  There are hundreds of really good submissions.  My manicure for this entry was inspired by blogger Nailside's - Explosion tape manicure.  Her work is so awesome & I finally, with much practice was able to figure out the tape placement for the explosion.  I did have to use Seche Vite in between each layer of polish because of time restrictions with my boys but I was able to get it all out neatly.  Also since I had that layer of Seche Vite in between, wherever there was a mistake I was able to take my tiny paint brush with acetone and quickly fix it without ruining the rest of the application.  It was pretty fun to do & was inspirational for other manicures I plan on doing.  I used Revlon's - Metallic, Santee's - Black & China Glaze's - Pretty in Pink.  Thanks for visiting!!

Monday, May 21, 2012

Betsey Johnson Bag Nail Inspiration


I did this manicure a bit ago but never posted it.  I don't know how I could have forgot, it's so cute. I was at Marshall's with my sister the other day and came across this cute Betsey Johnson bag.  It was this blag bag with a cute floral pattern.  It looked easy enough to re-create on my nails so I gave it a try.  This was my first time doing flowers.  I used a small nail art brush from Michael's ($3, also handy for cleaning up the cuticles after completing a manicure).  In Nail Nerd's blog she has a quick & easy tutorial.  I first applied a black base with white polka dots.  I put a top coat of Seche Vite so I can get straight to work on the flowers.  For the leaves I used OPI's - Uh Oh Roll Down the Window and for the flowers: the center color is Forever 21's color in Beige and the petals are NYC's In a New York Minute as well as Color Club's Pink Luster.  It was really simple and didn't take long.

On another note I purchased some Revlon ColorStay polishes.  Wow! These are really pretty.  I'm going to swatch them tonight and post some coupon information.  Thanks for visiting!!

Wednesday, May 16, 2012

Rainbow in the S-Kylie

I had planned on doing some nail art last night since I got some inspiration from a dress at the mall yesterday only I couldn't wait to use the polishes my dad and sister got me for mother's day.  It's so cute that my dad knows what all (5) of his daughters would like as gifts.  So I got Nicole for OPI - Rainbow in the S-Kylie and Love in your Life.  I put it over China Glaze's - Sexy Silhouette.  That color is my new favorite red-pink polish right now.  The camera does it no justice.  Actually the camera and my photography do neither color justice.  They are a really great combination.  Please excuse the horrible pixelation in these pictures.

Rainbow in the S-Kylie is so pretty, it's hard not to look at it.  It's shiny and packed with tons of all sized colorful glitter.  I would have put it on all my nails only at work I have to keep in mind to be semi-conservative so I stuck with just an accent nail.  It's a dupe for Deborah Lippmann's - Happy Birthday.  I actually like it better because of the different size glitters.  It gives a nice pop of color over the smaller pieces of glitter.  Love in your Life on the other hand is pretty to look at - in the bottle.  That color is horrible! There isn't enough hearts in the bottle and even if you give it a good shake or hold the bottle upside down, the brush still doesn't pick up more than maybe one or 2 hearts.  Application is a nightmare as well!  The brush will actually brush off whatever pieces of hearts make it on to the nail.  You would have to literally fish out the hearts and place them on your nail.  The color itself is too light.  It's almost just a clear polish with a hint of pink and glitter.  I exchanged it for a few other colors.  Thanks for visiting!!

Monday, May 14, 2012

Mother's Day Manicure

Base Color: Sally Hansen's Hard as Nails - Love Rocks,  Stamp Color: Jordana - Cabaret & Rhinestones from E-Bay
So this is my first official nail art post.  I put the kids to bed and got to work on this. Please excuse my photography, I'm working on it.  I shared pictures from different types of light.  I'm trying to find out what works best.  So for the last month or so I've been using Nailtek Foundation 2 as a base coat and Seche Vite as a top coat.  I notice that my manicure won't last beyond a day and a half or so with that combination before it starts peeling off in sheets.  I also noticed that my nails are peeling.  I'm not sure what's causing it but I decided to go with something different.  

I purchased Sally Hansen's Hard as Nails base coat and used OPI's Rapid Dry Top Coat for this manicure.  I'm trying to find a top coat that will dry as quick as Seche Vite but not shrink.  As much as I love Seche Vite's drying time, I can no longer ignore the ridiculous shrinking and awful smell.  I can do a manicure and within a few hours the nail polish has shrunk back so much you don't even have to look closely to see a big space of naked nail at the top of my nail.  I can't see putting so much time and effort into a manicure only for it to be ruined by shrinkage. Although for this manicure after using OPI's Rapid Dry top coat, I was forced to go over it with Seche Vite. OPI's Rapid Dry just didn't cut it.  It had very little shine and was taking forever to dry.  I'm going to try out Essie's - Good to Go fast dry top coat.  We'll see how that goes.

I do like the Sally Hansen base coat though.  My nails do feel stronger than with the Nailtek base coat.  And they have yet to chip.  It's also free of the "The Big 3" harmful toxins, and inexpensive ($2 Walmart) which is always a plus.  On another note, I have been reading Sammy's blog post's from her Nailsaurus blog all weekend.  She has a post on just about everything nail related, I was reading up on her photography.  I can't believe her work! She is out of this world good!  It's like each post is better than the last. I thought I would share her link because it got my nail art ideas going.  Thanks for visiting!!

Monday, May 7, 2012

BEST Alternative to Cuticle Oil - Lanolin


I had these hidden gems in my house all this time and never knew it! I have extremely dry skin and cuticles.  Even after purchasing lotions with some really grand claims, my skin will be dry within the hour.  So I am that person that has lotion in the car, on my desk at work, purse, junk drawer at home etc... I need to have it always within reach, just like chapstick.  I breastfeed, so for me lanolin is my best friend.  This cream can literally heal me over night! It has tons of vitamins and agents that promote quick healing and bacteria growth prevention.  It's also extremely thick.  The explanation says that it speeds up healing and locks in moisture to prevent cracking and drying.  So I put some on my hands and cuticles.  It was definitely too thick to wear on my hands but perfect for my cuticles.  It runs from $7-$10 and the tube will last a while. 

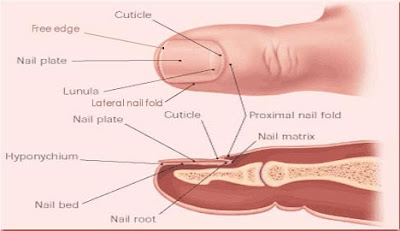
I recently learned that I shouldn't be cutting my cuticles at all.  At a nail salon I used to frequent, this is the main part of a manicure.  They take the cuticle nippers and clip the entire cuticle off.  The nail does look neater for a day or two until the cuticle begins to grow back.  So I started reading up on it.  After doing some research it seems like with most things, cuticles are there for a reason - protection.  The cuticle is a layer of skin that basically grows from the skin at the base of the nail over on to the nail itself.  It protects the finger and nail from bacteria entering under the nail bed and causing an infection.  I started thinking to myself, WHY WOULD WE INTENTIONALLY BE CUTTING THESE OFF?? I can remember a couple of times after I would get a manicure, my nail bed would be sore and sometimes get red and a bit irritated. I usually never contributed it to the manicure I just got.  Now it all makes sense.

There are some products out there that help with keeping cuticles neat.  Cuticle edges do dry up and wind up flaking off for the new cuticle to come in.  I came across a product that helps to clean up this dry skin quickly.  So instead of cutting off your cuticle, just clean up the dry area.  Nfu Oh Cuticle Remover works wonders!The nail polish size bottle will last you forever and it works quickly.  I dab this on my nail and with an orange stick immediately start gently rubbing this into the cuticle.  It quickly begins to slough off the dead part of the cuticle.  I then wash it off and my nails and cuticles look neat and in tact.  So the protection remains.  I have found it the cheapest here at www.fabuloustreet.com.  It sells for $11.50 and shipping is $2.80.  I was put off at first because it is expensive for a cuticle remover, but it really does an awesome and fast job.

Once I complete my manicure, I slather on the lanolin cream.  My cuticles actually feel healthy with this on them.  There is no tightness or dry feeling, no scent and it isn't too greasy or thick feeling.  I do actually prefer the Medela brand to the Lasinoh brand.  It's a tad more pliable, but both work wonderfully.  Thanks for visiting!!

Tuesday, May 1, 2012

Loreal Spring Colors


Eiffel For You

Spice Things Up
Greycian Goddess
Safari Chic
Versailles Romance
Mauvelous
I've been seeing Loreals Spring colors in stores and finally broke down and bought a few.  The colors are really eye catching! They retail for $5.99 and if you have a coupon, you can get them even cheaper.  As of today Rite-Aid stores have a buy one, get the second half off.  If you buy two and use a coupon for both you wind up paying just $3.50 for each and these colors are very worth it.  Also at Rite-Aid since my purchase was over $20, I got $10 on the store card to use on my next purchase.  No minimum amount required to purchase.  Just $10 to spend in the store.  You really can't go wrong. I would have liked to swatch each color by itself, but my 8 month old hardly let's me use the restroom alone.  So from pinky to pointer, the colors are Greycian Goddess 560, Spice Things Up 340, Eiffel For You 320 and Safari Chic 520.

I purchased two more that I didn't swatch but added the photo here.  Versailles Romance 310 and Mauvelous 320.  They all come out a bit darker than what you see when looking at the bottle.  Also you wouldn't need more than 2 coats to get it opaque.  The only one that needed 3 coats maybe even 4 was the Versailles Romance, it was more of a sheer color.  They application is nice but the brush has much to be desired.  It's almost like you can't put much pressure on it or it will streak on your nail.  Though for $3.50 you can't go wrong.  They really are pretty colors.  Thanks for visiting!!